Saturday, March 09, 2019

Kitchen-Hallway

The kitchen and hallway, and the house in general came with a feel that first seemed nautical but then more like a prairie farmhouse. 

After finishing the pot rack, the Essex Green just wasn't working.  Below is the kitchen originally.  The kitchen is to be painted to match with the pot rack, and the hallway, and not clash too much with the cherry cabinets.

Here you'll see the changing of the chair rails and French door mouldings. And would you agree that the chair rail is too high? To me it looks off balance. So, the new chair rails are installed lower to the floor. And around the French doors is what's called brick moulding. Brick moulding is too narrow and you might agree it looks flimsy against the more stately French doors. 


Step 1 was remove wallpaper in kitchen and hallway. The rented wallpaper-steamer below did a great job of dripping water down the walls, but it didn't take off the wallpaper.  It could be the wallpaper was too thick or waterproof.  I ended up removing the wallpaper by scraping off the top layer, then soaking the adhesive layer with vinegar. The remaining wallpaper scraped off easily after using vinegar.

Steamer....

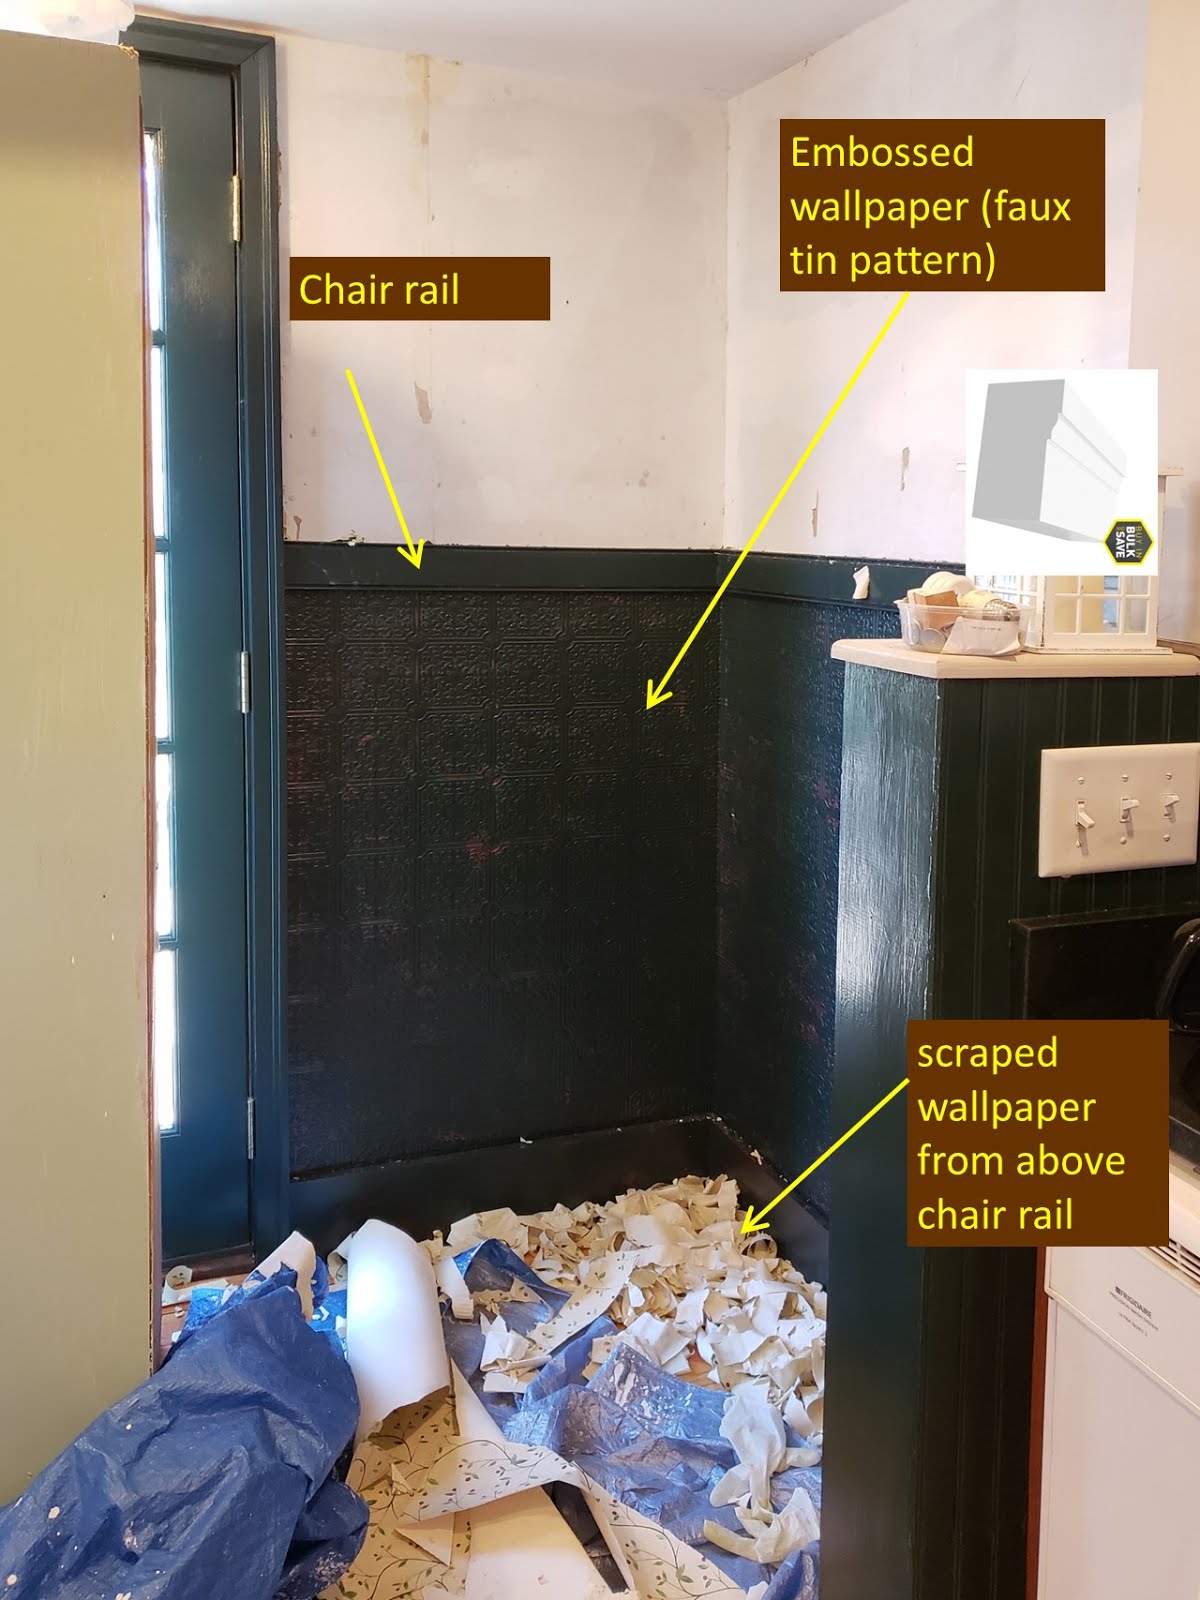
After removing wallpaper, is what you see below. The Essex Green, that I used after installing the pot rack, is on the embossed wallpaper beneath where the regular wallpaper was.  It's a beautiful green, but too strong and doesn't work here. The chair rail is also to be lowered. To lower the chair rail, I also have to remove the upper foot of embossed wallpaper beneath the original chair rail.


Below, I'm experimenting with new wall colors. Some colors I tried were too light, dark, pink, purple, red, warm, or cold. The doors are primered.


The white strip is where new chair rail will go. The above and below are the same photo. Below, I used a photo editor to stretch the photo to look more realistic. I did that with most photos in this post!


For new chair rail, I used a wider moulding typically used around doors. But it's the right look here, for me.  The brick moulding is replaced by 5-inch wide boards along the French doors.


Here/s where I arrived at a final color scheme.


Final color scheme is below. I still need to install boards above the doors.


whoops, that Water tank label should have been removed!

HALLWAY

The hallway was originally done the same way as the kitchen:


I tried Essex Green in the hallway, when I did the pot rack.  Besides that it seems too strong a green, it makes me realize that I want to go with a warmer color.


The chair rail itself was easy to pry out.


Embossed wallpaper wasn't too hard to remove from the hallway.  In the kitchen, it stuck more to the dry wall, so took longer to scrape. In the hallway, the walls are cement plaster, with some old linoleum in some areas.


New experimental colors!  White is where the new, lowered, chair rail will go.  I need to use stained wood for the chair rails, to match the woodwork.

The scene at Home Depot, where I experiment with different mouldings and lattice to make a chair rail that fits in.  I put together three types of wood strips, that will combine to make a nice wide chair rail. The original chair rail seemed too narrow.


The above must be stained. I tried to find the best match. Golden Oak seemed to work, but was too light. So, I went over it with amber shellac, and the match was better. It's not perfect, but good enough!

Before....


During....


After....


Back to the Kitchen

Above the counters, I used a two-tone color scheme. The sequoia color is what's in the hallway.


Sunday, January 20, 2019

pot rack is just the beginning

Let's call this the first "fun" project because it's a creative project as opposed to a repair. This blog post shows the removal and squaring-off of the arch, new lighting, pot rack, and trim painting. Future work will be needed to make other areas of the kitchen and adjacent hallway to match the new trim color.

The original idea is that I could use a pot hanger above the sink, to keep pots in easy reach, and also so they don't take up so much space on the dish rack after washing.

Above the sink originally was this dimly lit arch.  To me it looked to serve no purpose. Imagine instead the same space with better lighting and storage!


What's above that arch?  It's scary not knowing what you're going to find. It was built as part of the original house.  What will be up there to hang a pot rack from, with the arch gone?  

First step was to poke through the arch.  The picture below, is looking upward.  I hammered away, and pieces of cement and dust went everywhere. At this point, there is no turning back!  


Behind the cement was like a very strong chicken wire mesh, and other metal and wood shapes that formed the arch shape.

Below, the cement and wire mesh are mostly gone.  There was a dust storm caused by banging the cement and yanking out metal and tons of nails.

A wood cutout formed the facade and shape of the arch.  That yellow thing in photo below is the sawz-all.

Next, I squared off the the arch using the sawz-all (demolition saw I bought when replacing the front door at the first house).


This next shot, is looking upward, from where the arch was.  I found there to be several short beams, which will work for fastening the new flat ceiling, and hanging the pot rack from. The miter saw, jig saw, power drill, sawz-all, Dremel high-speed cutter, and belt sander were all put to much use at various stages of the project.  The old arch was very solidly built.


The old wiring was so old, that the insulation flaked right off.  I used heat-shrink to re-insulate the wires.


Below is the new ceiling piece. It's 1/2 inch sheet rock, the mildew-resistant kind since it will be near the sink.  It's about 5 ft x 1 ft in area, to lay flat above where the arch was.


Below, I've marked two circular cutouts for inserting can lights (recessed lighting).  Easier to cut now, than after I've fastened it to the wall.


Testing the circuit and new connection box. It works! So much banging could have done something to the old wiring, but it survived!


After putting in the lights and screwing in the ceiling piece,  I then nailed in white birch board to square everything off. 


Prep for painting can be seen below In addition to above the sink, I'll be painting the stained woodwork above the cabinets. You can see the white primer, and blue teal sample paint. I didn't end up using the teal.


Photo below shows prep on the opposite side of the kitchen too.  This pot rack project is also the beginning of a new color scheme for the kitchen.  The red area (below, to right) will be painted another color to be determined.


The plastic drop cloth did a great job catching all sorts of raining debris.  With the kitchen in this way, it was a great excuse to order a calzone from Da Vinci.


Below, the woodwork is being painted Essex Green.  A bold, cool color was needed to compete with the strong warm color of the cherry-stained cabinets.


Also painted the wainscotting between the counter and cabinets!


Finally, pot rack!  I got the idea from the internet, to use an old ladder from the garage.  A few threaded eye hooks and "S" hooks and instant pot rack!


Mohawk Trail leaf peepage

  In this post there is much foliage to be seen between Greenfield and North Adams, in northwest Massachusetts. You'll see a series of p...