Monday, September 06, 2010

bedroom paneling/trim

In this post I put up trim, paneling & track-lighting in an upstairs bedroom.

Picture below of the bedroom, that I took at the realtor open house when I first looked at the place. Can you notice that the vaulted ceiling is plain wallboard, and there is not much in the way of trim around the closet? The work in this post is to give the room definition and charm.

In the following pictures I install textured panels on the vaulted ceiling, and border the top & bottom of the panels using trim made from planks.

Picture below shows the making of trim to go above and below textured panels: 5 x 1 planks, nailing screen strip to side for a beaded effect as I had done in living room:


Shelf for window. This house does not have thick walls for deep-set window sills. So the shelf will project out into the room. to provide the needed storage. Sorry the picture is sideways.


Photo below shows shelf upside down. The part that is vertical here, will go against the wall beneath the window. Can you see the 2 x 2 brackets which will help support the shelf? Both the shelf and vertical support wood will be nailed or screwed to wall studs.


In picture below, 5x1 planks, lattice screen strips, & panel


Below, 5x1 with (right) and without (left) screen nailed in.


In photo below you can see the bead effect, in plank on right. A "bead" is just a groove in wood to give it a textured effect, such as seen in wainscoting. It is easier for me to nail screen strips to the wood, than it is to cut a bead into the plank using a router.


Below, cutting MDF textured panels for vaulted ceiling, using table saw and circular saw:


Below, cutting starter hole to insert the star rosette into a chair rail. I was then able to square the hole using a sabre saw, see the hand held power saw to the right? There is a picture of the final result further below.


Below, nailing moulding to a post, which will support a small shelf and serve as one end of the wainscoting (the wainscoting will not go around the entire room, so the ends need to be visually bracketed).


In picture below, the planks, paneling, and most of wainscoting are up. I used the same textured paneling along the wall and vaulted ceiling. Along the vertical wall, I'm calling it wainscoting and on the vaulted ceiling, calling it paneling. But really it's the same exact board material from Home Depot. Planks and baseboard define both top and bottom of the panels and wainscoting. You can see the small shelf and post from the previous picture, where a black soda can is on the shelf.
Picture below shows wider trim I put in around windows, and the chair rail with star rosette from previous photo.


Picture below shows small shelf to right of door. Door (unhinged) on right is antique from New Bedford, I believe there is an earlier post about this door. The smaller door in this picture is eave access hatch.


Wider trim around door and closet, in picture below. I'm using 4 x 1 with screen strips, similar to the rest of the house, where I'm gradually replacing all clamshell moulding which was only 2 1/2 inches wide. 4-inch wide trim gives so much better definition of doors and windows, in my not-so-humble opinion.


In the eaves, here I am installing a light switch for new track lighting! It is easy access to the backside of the walls here.


Picture below shows new junction box, above an existing electrical outlet box.

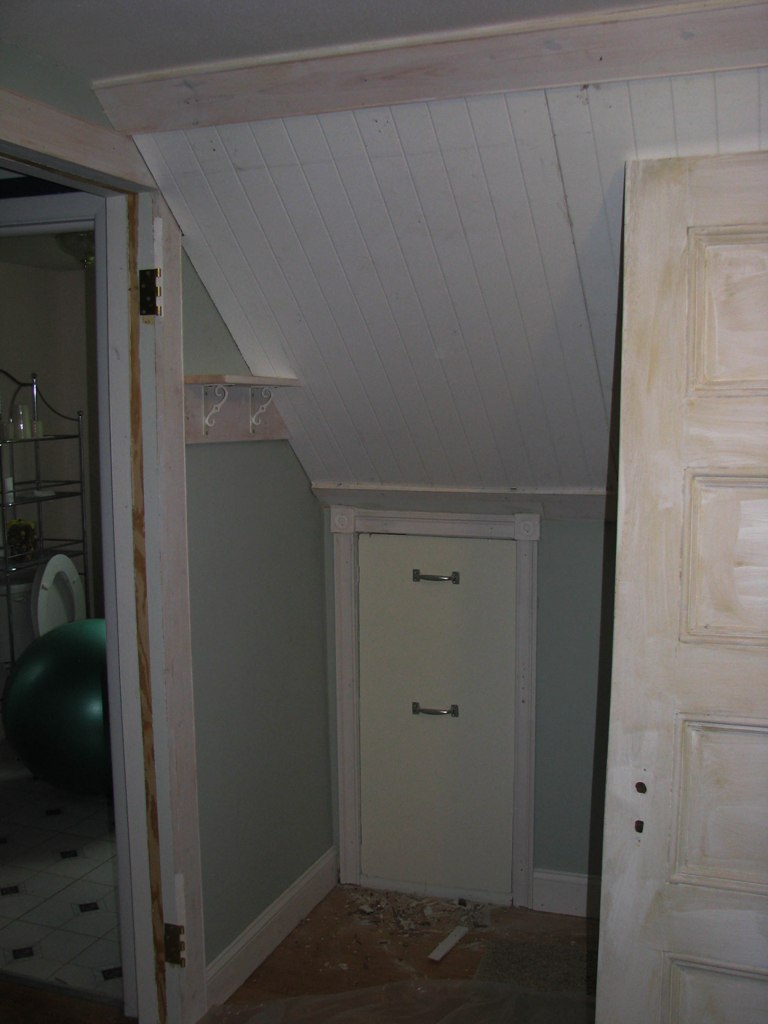
After making wire connections....


Hole cutout for new light switch:

Paneling complete!


Track lighting...just one light is in for now, to test the circuit:


Ready to paint!


Wiring for new light switch:


Painted! And check out the window grilles.


I put the track lights along the vaulted ceiling so they can serve as reading lights when a a double bed eventually goes into this room.


The new colors are Behr brand from Home Depot: walls are Orange Confection, trim/panels are Swiss Coffee. The previous color (Distant Haze) is still in the closet, on left.


Monday, August 30, 2010

kitchen cabinet door replacement/painting

In this post, the curved upper cabinet doors are replaced with new style cabinet doors, and all kitchen cabinets are painted.

Original kitchen below from open house, in picture below. The curved "cathedral" style cabinet door pattern as seen in the upper doors, and the wood-grain, were not working with the overall theme. The recent woodwork and paint scheme as seen in previous blog posts is somewhere between Victorian and rustic colonial.


The following pictures are before hosting a party last weekend, when the house is always cleanest.

Painted cabinets in picture below. Same exact view as above, 2 1/2 years later. Compare the square upper cabinet door tops to the previous curved.


The upper right door above stove still needs to be replaced, see the curved top? Because HD messed up the order and had to send a replacement.


On wall opposite cabinets, antique photographs & prints from around or before 1900 help define the association to the era:


The replacement cabinet doors were easy to order from Home Depot because the previous doors were also from there. They were super easy to re-install because the hardware cutouts matched the existing hinges.


The house is starting to feel entirely Connecticut. I went with white on the cabinets - same antique cream as the surrounding trim - because it blended with the surrounding color scheme. Before the white, I tried colonial gray-blue, then rose cream, for the cabinets. Neither of those looked great to me because there became too many colors in the room.

The glass door cabinets are from Home Depot but the plate-glass is from a local supplier. The glass itself is "glue-chip" glass which is a custom textured glass style. It cost like half as much to get the glass from a local supplier.


Close up of glue-chip (click to enlarge):


you can order cabinet doors "cut for glass" which means the doors are essentially a frame into which plate-glass can be inserted. The cost is somewhat higher than solid wood panel, because the cutout involves more millwork.

Wednesday, August 11, 2010

mid summer

late in the day and no time to add cicada (heat bug) sound effects to this post.


peppers & butternut


kale


kale


kale. look close up, see holes in the leaves? buggums & worms also enjoy the kale.


Monday, July 26, 2010

office

headquarters for hydrogeologic engineering operations, famously relocated.....


Saturday, July 24, 2010

split-rail fence & fire pit

Fire pit

This fire pit is a simple unmortared stone circle, Joe and I put up today. Joe is my 12 yr old neighbor.

Setting up: trapezoidal cement block from local supplier, traprock base from neighbor, 2 bags playsand.


The rest of the blocks were still on the truck, also cinder blocks + lanscape tiles for tray table next to fire pit


Partway done. The surrounding grass being removed by hoe and is to be replaced with traprock, as protection from sparks from fire.


Fire pit! The pit is surrounded by traprock to prevent fire from sparks coming outside the pit. Inside the pit, are 2 bags of playsand as a base, then a couple inches traprock over that. This design is the same as the neighbor's who helped out.
Coulldnt take a final shot without Emily running in.
Split-Rail Fence
.
This split-rail fence took a weekend to put in with help from Joe and Tony. It's 16 sections, around 200 ft. It is decorative, and uses pressure-treated split-rail timbers and posts from Lowe's. It runs along the street on both sides of the driveway, and partway up right side of driveway.
Below, the "before" picture. Check out the stakes- I used these stakes to play around and decide where exactly I wanted the fence to go.

Below, some of the tools: Posthole digger was essential. The holes were 22 inches deep. It took 20 minutes per hole provided there werent too many rocks. The prybar to the right was for loosening up rocks in the hole. The shovel is to dig out the grass & start the hole.
Partway through. It helps to put the dirt onto a tarp, so you don't have to clean up the lawn afterward.


Assortment of split rail timbers and line posts. There are three types of posts: end posts, line posts, and corner posts. The end and corner posts have slots in one or two sides of the square posts. Line posts have holes straight through so the rails can overlap.
Cement and traprock. Post-setting cement is easy to use because you can just add mix and water to the hole, without having to mix it in a barrel. Traprock is set at the bottom of the hole before putting the post in, to allow drainage so moisture doesn't wick up the wood post and cause early rot.
After setting Post-Set concrete.....

We used 1 - 2 bags of post-set per post.

We ended up mixing a batch of cement to smooth off the ground and slope around the posts so water drains away from the wood posts.

Cleanup Time!


Some rocks pulled from the post holes...


Finished !!


Line post closeup


Mohawk Trail leaf peepage

  In this post there is much foliage to be seen between Greenfield and North Adams, in northwest Massachusetts. You'll see a series of p...